Dynamic UI with CDK TemplatePortal and DomPortalHost

Ever wanted to place some piece of UI dynamically from one component to another? But the component that owns the content doesn’t have any connection to the component that should display the content. In this article we’ll learn how we can leverage Angular CDK Portals for achieving exactly that.
Contents are based on Angular version >= 5.0.0
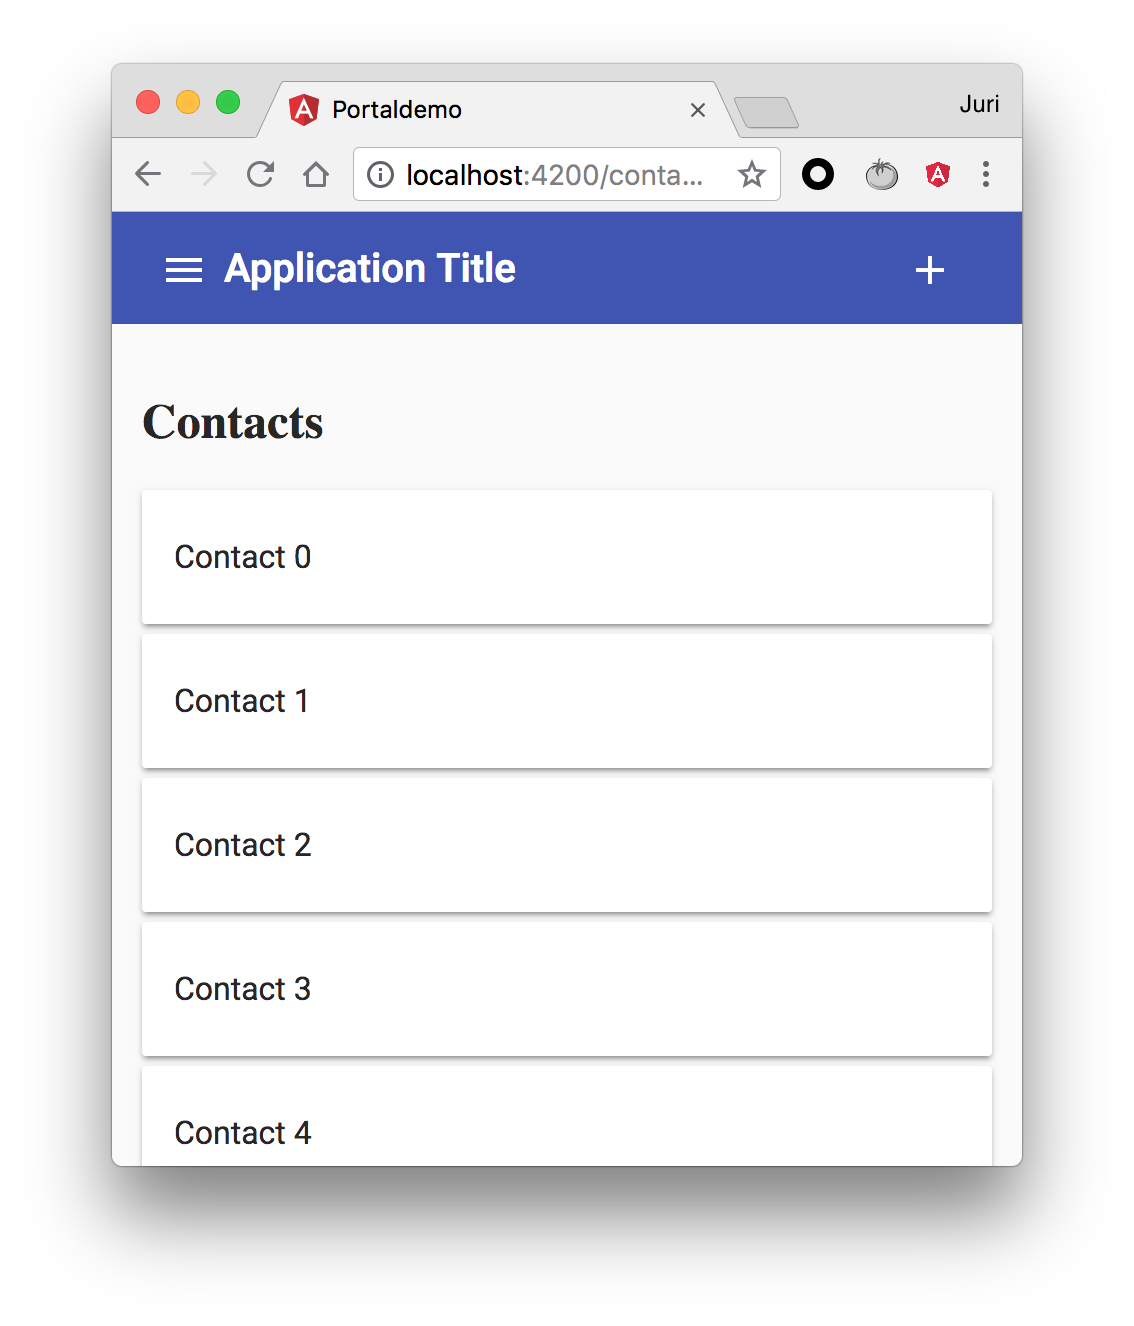
Let’s assume we have this simple (mobile-like) application.
As you can see we have a toolbar with the side-bar menu button and application title, and a central area, currently displaying the home app screen. When the user clicks the menu, he/she can navigate to different screens as you might expect. Each of these screens (i.e. our routed components) has a set of specific actions. Whenever the routed component gets activated, we’d like to display those actions (lets call them page actions) inside our application’s toolbar. This is a common scenario especially in mobile apps.
Note the “add” icon at the top-right of our toolbar.
Now, from a “componentization” point of view, we have some kind of ShellComponent which creates the overall layout including the toolbar, the sidebar (both of which could also be separate components) as well as a central area where our routed components will be placed. That said, the routed components don’t have any knowledge where they’re placed. We don’t want to have a hard-coded reference to the toolbar or whatsoever.
Basically in our specific demo app,
- the
ContactListComponentdoes not have any knowledge of the toolbar. It might reside in a different (even lazy loaded) Angular module. Also, we wouldn’t want to couple them together. - The displayed action is context specific though, meaning if we click the ”+” button, some function on our
ContactListComponentgets triggered.
Approaches
The page actions could be defined as follows within our ContactListComponent
<ng-template #pageActions>
	<button type="button" class="toolbar-btn" mat-icon-button (click)="onSave()">
  		<mat-icon>add</mat-icon>
	</button>
</ng-template>
We could grab the <ng-template> within our component class using @ViewChild('pageActions') and then pass the template reference to our toolbar component, for instance via some shared service.
While we could totally implement this by ourselves, in this article I’d like to use Angular CDK Portals.
Angular CDK
As part of Angular Material, the team at Google also releases the Angular CDK library. It’s an effort to abstract the core parts of the developed material components into a dedicated library that can be used without necessarily having to use the Material Design guidelines. As such, the CDK can be used as the foundation for building component libraries on top. You can create modal dialogs with your custom style/theming and functionality on top of CDK, with the benefit of being able to reuse things like creating overlays, binding keyboard shortcuts etc.
The CDK can be installed via NPM using the @angular/cdk package.
CDK Portals
The portals package provides a flexible system for rendering dynamic content into an application.
Basically they help us take some piece of UI which we can dynamically render into some slot on our UI. Sounds exactly what we want :smiley:. CDK Portals allow us to dynamically render either a Component or a TemplateRef.
More on the official documentation.
Deep dive into working with DOM in Angular and learn about the difference between embedded views and host views
DomPortalHost and TemplatePortal
When using CDK Portals we need to distinguish between two parts:
- the portal (which - as mentioned - is either a
ComponentPortalorTemplatePortal) - the portal host which is the so-called “open slot” where we want to render our dynamic content (our portal).
For our scenario we use the TemplatePortal, which allows us to reference a TemplateRef (which we can grab from an <ng-template>). Then we want to define some arbitrary DOM element (i.e. a <div>) where we want to place our <ng-template>. For that use case we can use the DomPortalHost, which is describe like this:
A PortalOutlet for attaching portals to an arbitrary DOM element outside of the Angular application context.
See the docs for more details.
So basically this is our definition of the slot where we want to render the dynamic content:
<!-- in our toolbar hosted by the shell.component.html -->
...
<div fxFlex="50px" id="page-actions-container">
	<!-- content will be placed dynamically via Cdk Portal -->
</div>
...
The implementation
First of all, we create some reusable component which we call PageActionComponent and which is defined as follows:
@Component({
  selector: 'app-page-actions',
  template: `
  <ng-template #pageActions>
    <ng-content></ng-content>
  </ng-template>
  `,
  styles: []
})
export class PageActionsComponent { ... }
This allow us to define our “page actions” within our “page components” like this:
<!-- contact-list.component.html -->
...
<app-page-actions>
	<button type="button" class="toolbar-btn" mat-icon-button (click)="onSave()">
		<mat-icon>add</mat-icon>
	</button>
</app-page-actions>
By using Angular’s content projection, we can project our buttons into the <ng-template> which we’ll later reference and pass to our CDK portal host. This gives us a very neat API.
Creating the DomPortalHost
From within the ngAfterViewInit lifecycle event we can access our pageActionsTmplRef. Next we need to create our DomPortalHost and pass it a couple of things.
import { DomPortalHost, PortalHost } from '@angular/cdk/portal';

@Component({...})
export class PageActionsComponent implements OnInit, AfterViewInit, OnDestroy {
  private portalHost: PortalHost;
  private portal;
  @ViewChild('pageActions') pageActionsTmplRef;

  constructor(
    private componentFactoryResolver: ComponentFactoryResolver,
    private injector: Injector,
    private appRef: ApplicationRef
  ) {}

  ngOnInit() {}

  ngAfterViewInit(): void {
    // Create a portalHost from a DOM element
    this.portalHost = new DomPortalHost(
      document.querySelector('#page-actions-container'),
      this.componentFactoryResolver,
      this.appRef,
      this.injector
    );

    ...
  }

  ...
}
Note how we use the document.querySelector to grab the DOM element we placed into our toolbar HTML before (see discussion further up). The ComponentFactoryResolver, Injector and ApplicationRef can be retrieved via the DI container and simply be passed along to the DomPortalHost.
Creating the TemplatePortal
We now need to get a reference to our template s.t. we can create a TemplatePortal to be attached to our portal host. As you can see we defined already a template variable pageActions which we can get a reference to using @ViewChild(..).
import { TemplatePortal } from '@angular/cdk/portal';

@Component({
  selector: 'app-page-actions',
  template: `
  <ng-template #pageActions>
    <ng-content></ng-content>
  </ng-template>
  `,
  styles: []
})
export class PageActionsComponent implements OnInit, AfterViewInit, OnDestroy {
  private portalHost: PortalHost;
  private portal;
  @ViewChild('pageActions') pageActionsTmplRef;

  constructor(
    ...
    private viewContainerRef: ViewContainerRef,
  ) {}

  ngOnInit() {}

  ngAfterViewInit(): void {
    // Create a portalHost from a DOM element
    this.portalHost = new DomPortalHost(...);

    // Locate the component factory for the HeaderComponent
    this.portal = new TemplatePortal(
      this.pageActionsTmplRef,
      this.viewContainerRef
    );

    ...
  }
  ...
}
Once we have our reference to the template, we can instantiate the TemplatePortal, and pass it the reference as well as the ViewContainerRef of our component.
We can even optimize this by using the cdkPortal directive directly, rather than a simple template variable:
@Component({
  selector: 'app-page-actions',
  template: `
  <ng-template cdk-portal>
    <ng-content></ng-content>
  </ng-template>
  `,
  styles: []
})
export class PageActionsComponent implements OnInit, AfterViewInit, OnDestroy {
  private portalHost: PortalHost;
  @ViewChild(CdkPortal) portal;
  ...
}
This way there’s no need to manually instantiate a TemplatePortal, but we can rather directly get an instance of it.
Attach the TemplatePortal to the PortalHost
Finally, we’re ready to attach the portal to the host, or better said, to render the dynamic template into the <div id="page-actions-container"> which is controlled by the DomPortalHost we created before.
@Component({...})
export class PageActionsComponent implements OnInit, AfterViewInit, OnDestroy {
  ...

  ngAfterViewInit(): void {
    // Create a portalHost from a DOM element
    this.portalHost = new DomPortalHost(...);

    // Attach portal to host
    this.portalHost.attach(this.portal);
  }
  ...
}
Destroy the CDK Portal
It’s always good to not forget to clean things up. Whenever our PageActionsComponent gets destroyed, we want to remove the dynamic content again, which is done by invoking the portalHost.detach() function.
@Component({...})
export class PageActionsComponent implements OnInit, AfterViewInit, OnDestroy {
  private portalHost: PortalHost;
  ...

  ngAfterViewInit(): void {
    this.portalHost = new DomPortalHost(...);
	...
  }

  ngOnDestroy(): void {
    this.portalHost.detach();
  }
}
Demo
That’s it. Here’s a running demo to play around with. Have fun 👍.