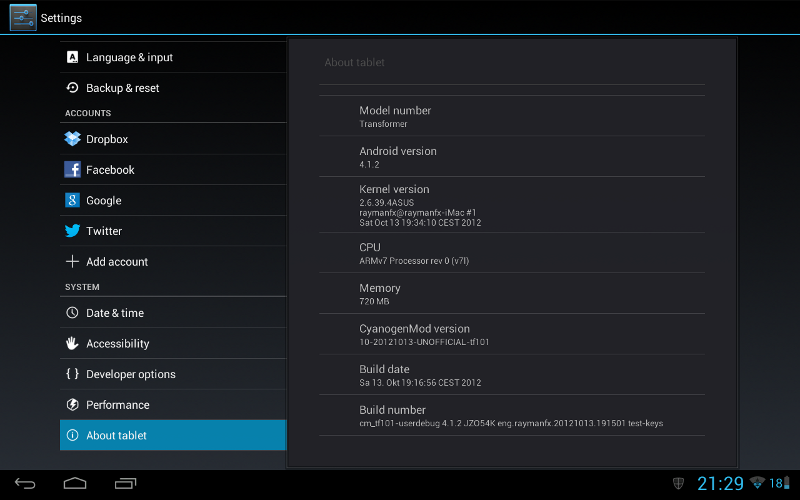
Transformer TF101 meets Jelly Bean powered by CyanogenMod


During the Christmas holidays I found a bit of time to upgrade my old (but still nicely working) Nexus One to CyanogenMod 7 and I’m really happy about that. Today I decided to give my Asus Transformer TF101 a go as well.
The problem is that apparently the TF101 doesn’t get the update to Jelly Bean and I definitely didn’t want to miss it, so CM is the best available option. Unfortunately it turned out that rooting and flashing the Transformer TF101 isn’t as smooth as I thought and it involved quite a lot of reading through forums till I managed to get it working on my device. As such, this post is intended to provide you with the right information in order to save you some time (and nerves) while upgrading to CyanogenMod.
Preface
Before continuing with this post here, please read through the official CyanogenMod installation instructions for the TF101.
Disclaimer: By following the instructions presented by this page you device gets rooted which voids your device’s warranty, may cause data loss or potential other damage. I’m not responsible in any way with such side effects but it is at your own risk.
Specs used for this setup
The upgrade has been performed on
- Asus Transformer TF101
- Kernel/firmware version 9.2.1.27
by using a Win7 x64 setup for rooting the device and flashing ClockworkMod.
Some Basics
Boot into recovery: Switch off your device. Then press Volume DOWN+Power button till you see the boot logo, then press Volume UP again.
Enter APX mode: Switch off your device, connect it to your computer and press Volume UP+Power button.
Preparation: Download CM and GApps Package
Before starting it’s good to download the necessary files and immediately place them on the devices internal storage (or sdcard mount) s.t. we have them ready when we need them.
- Download the latest (unofficial) CM 10 version (I used cm_tf101-v6).
- Download the Google Apps package for Jelly Bean v 4.1.2, that is “gapps-jb-20121011-signed.zip”.
Note that this is not an official CM version but one build by some XDA developer from the CM’s GitHub repository. See this forum entry for more details.
After downloading the above mentioned files, copy them over to your device. If you have adb installed and your device connected via USB debugging this should be as easy as
adb push cm_tf101-v6.zip /sdcard/As of writing this post there is no official stable Jelly Bean CM10 release or release candidate. Hence in this installation I used an unofficial one. You might get and check the CM download page for the TF101, however.
References
- CyanogenMod 10 - Gierdo’s Nightly Builds
- CyanogenMod’s Google+ post about JB
- How to upgrade TF101 to Jelly Bean
- Upgrade to ClockworkMod 6
Rooting and Installing ClockworkMod
The official CM TF101 wiki page suggests the use of Wheelie for loading ClockworkMod (a custom recovery) onto the Transformer. That approach didn’t work for me, however. When placing my Transformer into APX mode and after executing the mentioned command (see CM wiki entry), I always got
Wheelie did not detect a device in APX mode.
So I googled quite a lot and there are lots of entries on the XDA forums with one-click root&flash approaches, however most of them didn’t work as well. What you need to pay attention to is the kernel version (firmware) you have installed. I had version 9.2.1.27 while many of the root utilities are for older firmware versions which might also be the reason why they didn’t work.
“1-Click Transformer Root” worked!!
After a while I finally found the 1-Click Transformer Root which finally worked. You need Windows 7 (don’t know if Win8 works as well) for executing the root processes, however.
The tool makes rooting extremely easy, just follow the steps below:
- Make sure you connect your running Transformer device to your computer. Also verify that you have USB debugging enabled in your settings.
- Just download the file and run the “1-Click Transformer Root.bat”
- Follow the instructions given by the bat file
Your Transformer will boot multiple times and by the end your device should be rooted successfully.
In order to then install the custom recovery (i.e. ClockworkMod) you have to again start the “1-Click Transformer Root.bat” which now will present several options under which point 3 says “Install CWM recovery”. Choose that one and proceed. It should install Rogue XM Recovery 1.5.0 (CWM-based Recovery v5.0.2.8).
Don’t use the ROM manager for flashing ClockworkMod. See here for further details.
(Note if you aren’t able to download the file, just contact me as I should still have it somewhere)
Installing CM
If you successfully flashed ClockworkMod with the method mentioned before, then the Transformer should now be booted into recovery mode. The next steps involve
- creating a Nandroid backup
- wiping the data
- installing the CM from zip
- installing the gapps package from zip
Follow the installation instructions on the official CM wiki page for the TF101 for these steps.
Some Sidenotes
**Nandroid backup - ** If it gives you an error when backing up /data try to verify whether there is enough space for the backup. In my case I had to delete the Dropbox cache. You may also want to change the backup location to the internal memory rather than to the SD card (which on the Transformer is just a virtual partition). DiskUsage is a nice Android app for analyzing the used space of your memory.
Up and running
After successfully completing the steps before everything should be up and running.

So far the increase in speed is impressing, however if I manage I’ll write a follow-up post with some more infos after using the ROM for a couple of days/weeks.