Configure a proxy for your API calls with Angular CLI

In this article (video included!) we will learn how to setup your Angular development server and how to configure it to properly communicate with your backend (REST) API.
$1
Local development setup with Angular
Nowadays you most probably use the Angular CLI (or some extension of it) for generating your local development setup. This also includes the ng serve command which is wired up in your package.json that gets generated:
{
    ...
    "scripts": {
        "start": "ng serve"
    }
}
As such, when you execute npm start, ng serve will be invoked which is a command to the CLI to fire up its internal development server. That server is based on the Webpack dev server (at least as of now). You can then head over to http://localhost:4200 on your web browser and see your running application which is served straight from the file system. Behind the scenes happens a lot more, though (in the standard Angular setup). The webpack dev server is configured to automatically do the TypeScript compilation, compile eventual SASS to CSS and serve assets, all in memory without touching the file system (for perf reasons). Also it happens to automatically refresh the browser whenever something on your file system changes.
Issue: Dev server plus backend API
Things get a bit more interesting in a more real world setup where you have your Angular CLI development server running on http://localhost:4200 and your backend API (in whichever technology you like) running on some other port or even host, let’s say http://localhost:3000 (this could also be http://dev-123.mycompany.com or something else ofc).
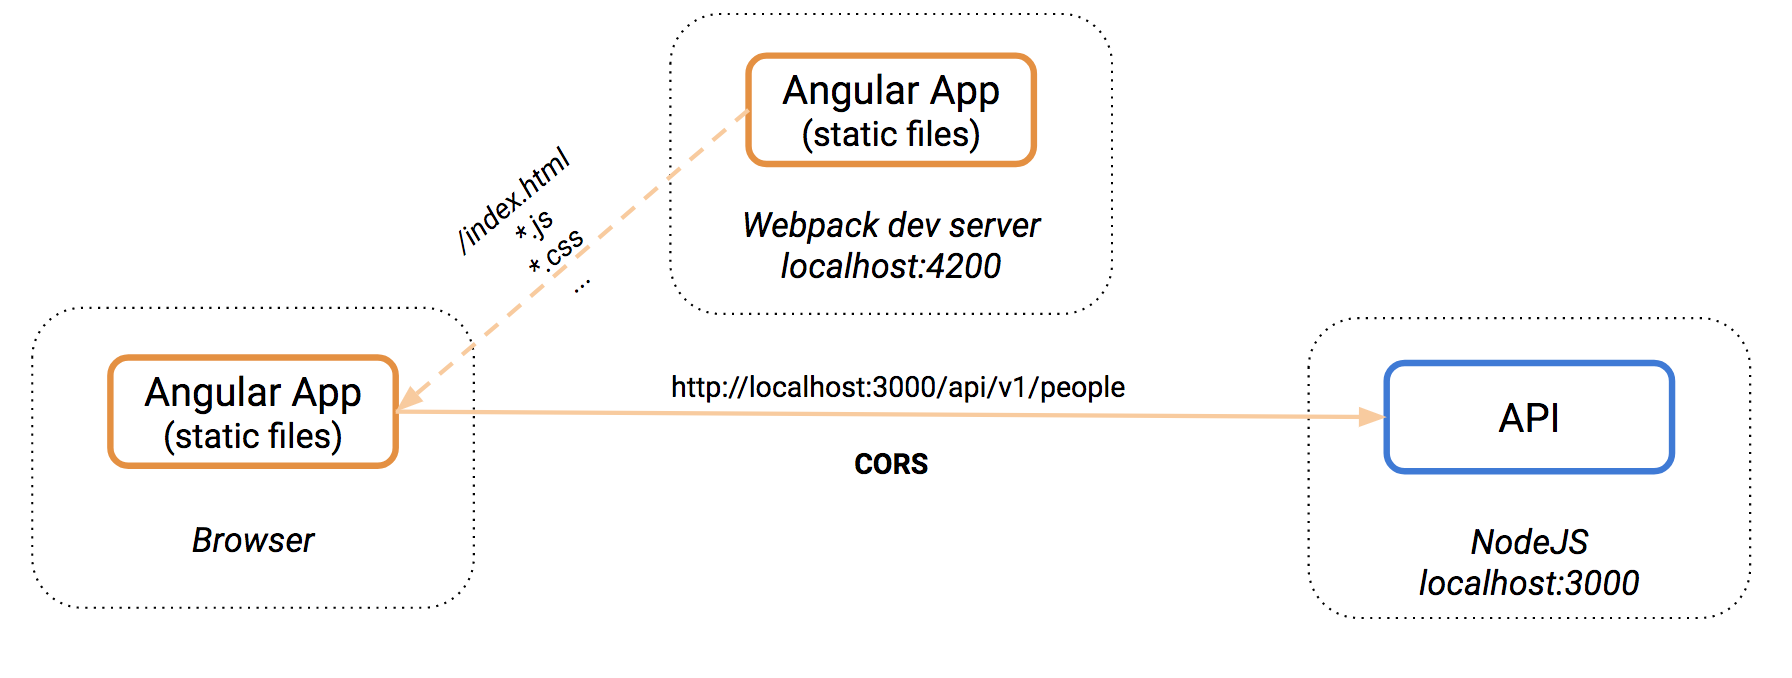
When you then want to execute an HTTP call within the app, you’d have to write something like this, indicating the full path of your backend API.
this.http.get('http://locahost:3000/api/v1/people')
    .map(res => res.json());
Obviously the base URL (i.e. the host) can be configured in a central place somewhere, such as via the environment.ts file (that gets generated by the Angular CLI). But there’s another issue as well. Unless you’re creating some publicly consumable API and you inject the required CORS headers, you’ll most probably get some CORS exceptions.
Configuring your Angular CLI dev-server proxy
There are different options:
- add the proper CORS headers - This is definitely a must in case when you design a generic API where you don’t even know the consumer.
- use a proxy - A proxy is a piece of software which is in between your JavaScript/Angular app doing the Ajax request and your backend API. This is the choice to go in a classic app.
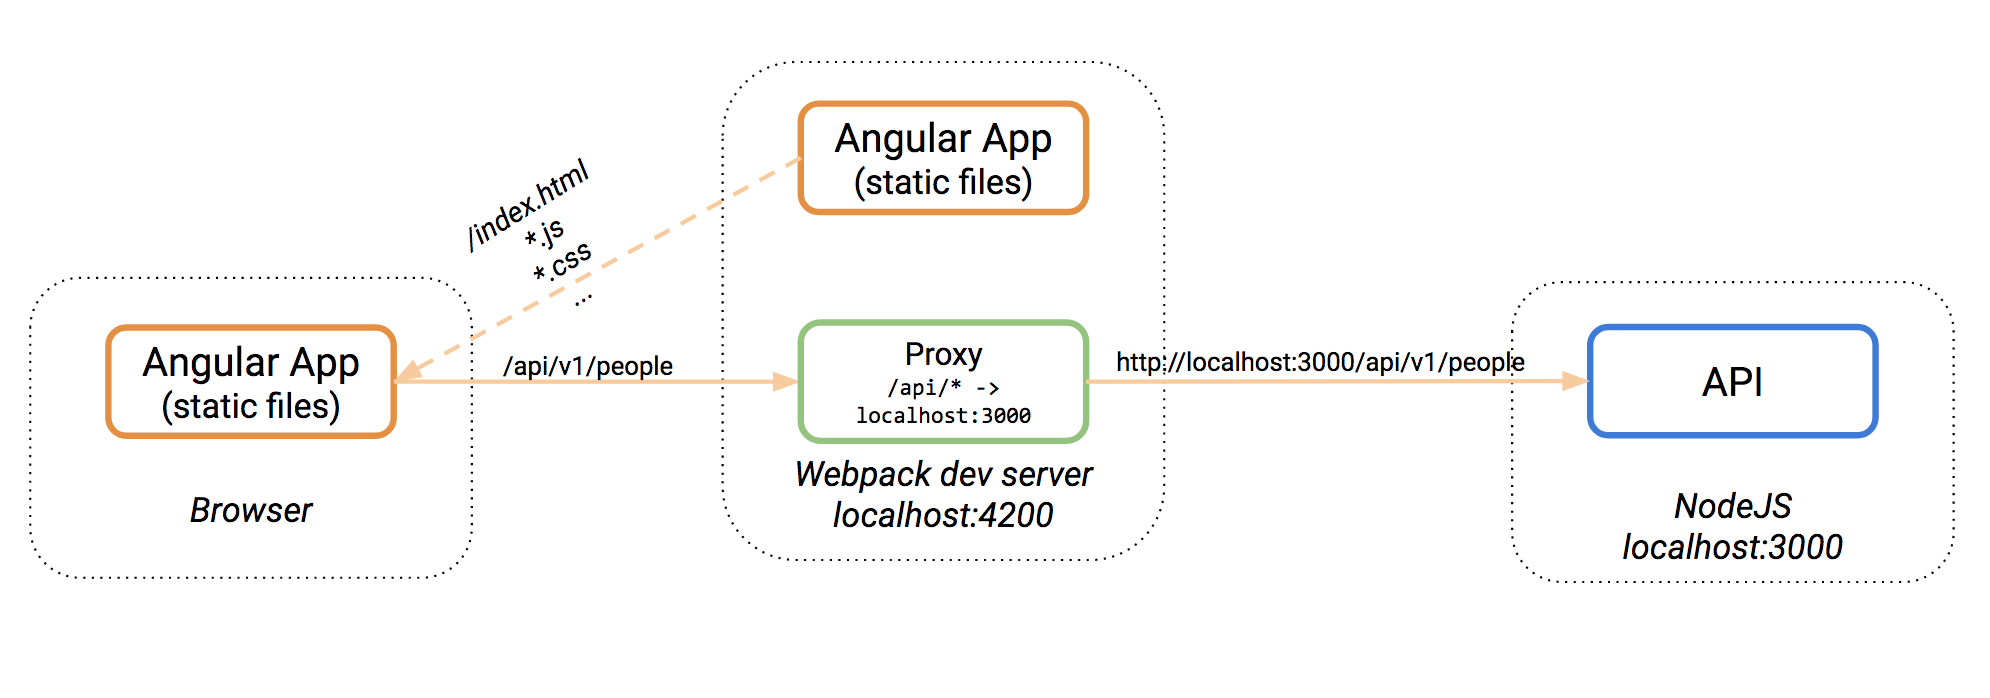
We will take a closer look at the 2nd approach here. What the dev-server proxy does is to simply take the browser request at the same domain+port where you frontend application runs and then forwards that request to your backend API server. CORS is a browser security issue and does not apply when doing “backend to backend” communication as is the case with a proxy in between.
The HTTP call inside our Angular application can then be changed to this:
this.http.get('/api/v1/people')
    .map(res => res.json());
With the proxy, our initial diagram would change to something like this:
Let’s now see how we can setup our dev-server proxy. The Angular CLI uses Webpack underneath. As a result also the dev-server we’ve been talking about so far is nothing else than the Webpack development server. Thus, the same configuration settings apply, which are described very well in the official Webpack docs.
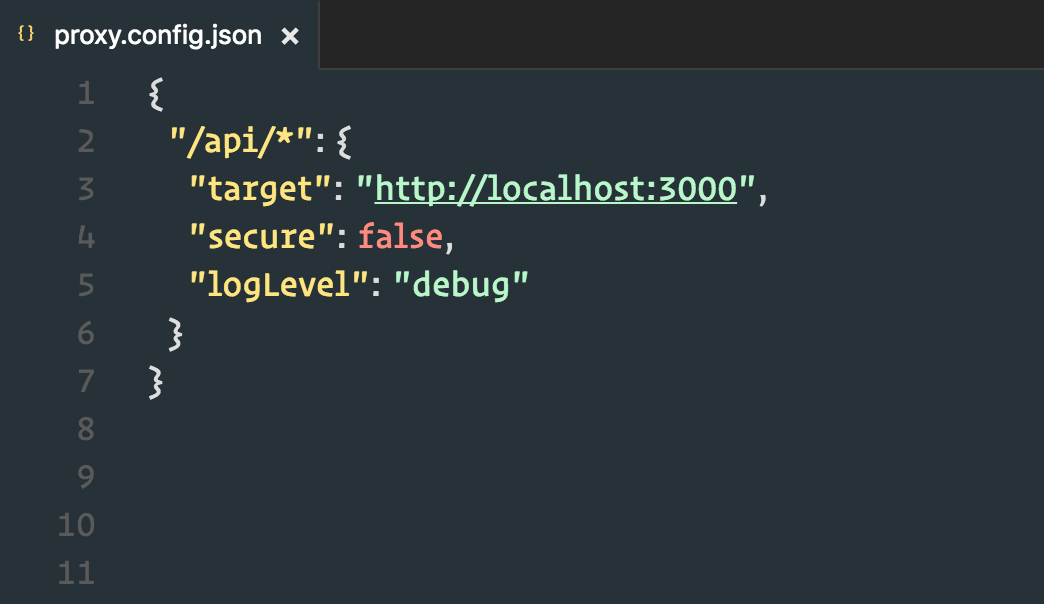
To set it up, we need to create a file proxy.conf.json at the root of our Angular CLI project. The content should look as follows
{
  "/api/*": {
    "target": "http://localhost:3000",
    "secure": false,
    "logLevel": "debug",
    "changeOrigin": true
  }
}
All requests made to /api/... from within our application will be forwarded to http://localhost:3000/api/....
Note the changeOrigin property. You will definitely have to set this to true when you’re using some virtual proxies (such as configured with Apache2) on your backend.
Configure the CLI proxy for Ionic 4
Luckily, Ionic for (to the contrary of Ionic 3) uses now the Angular CLI under the hood for serving, generating and building your Ionic project. As such, we can pretty much in the same way pass a proxy configuration to our serve command:
{
   "name": "my-ionic-4-app",
   ...
   "scripts": {
      "start": "ionic serve -- --proxy-config ../../proxy.conf.json",
      ...
   }
}
You can reuse the exact same proxy.conf.json from your normal Angular web project setup.
This is NOT FOR PRODUCTION
“How can I configure Angular CLI’s dev-server in production?” I get this question a lot. This is NOT FOR PRODUCTION
This configuration is ONLY for your development setup and should not be used in production, simply because it isn’t made for that. There are other, much more sophisticated solutions for your production environment, whether it is to deploy your app directly “into your backend app” or by serving it via Apache 2 or Nginx.
We will give that a closer look in an upcoming post :smiley:.
Video: How to configure Angular CLI devserver proxy
You prefer to watch a video how to configure the proxy? Here you go :smiley:
You didn’t yet have the chance to create an Angular application, but you’re eager to learn it? Watch my introductory video which learns you how to build your first Angular application using the Angular CLI in under one hour.
It's time to get started. In this video I will help you create your first Angular app