Implementing the 'Git flow'

Git can be used in a variety of ways which is cool. But still, when working within a team, it is good to have a consensus on a common, shared approach in order to avoid conflicts. This article quickly explains how we implemented the “git flow” pattern in one of our projects.
Git-flow…
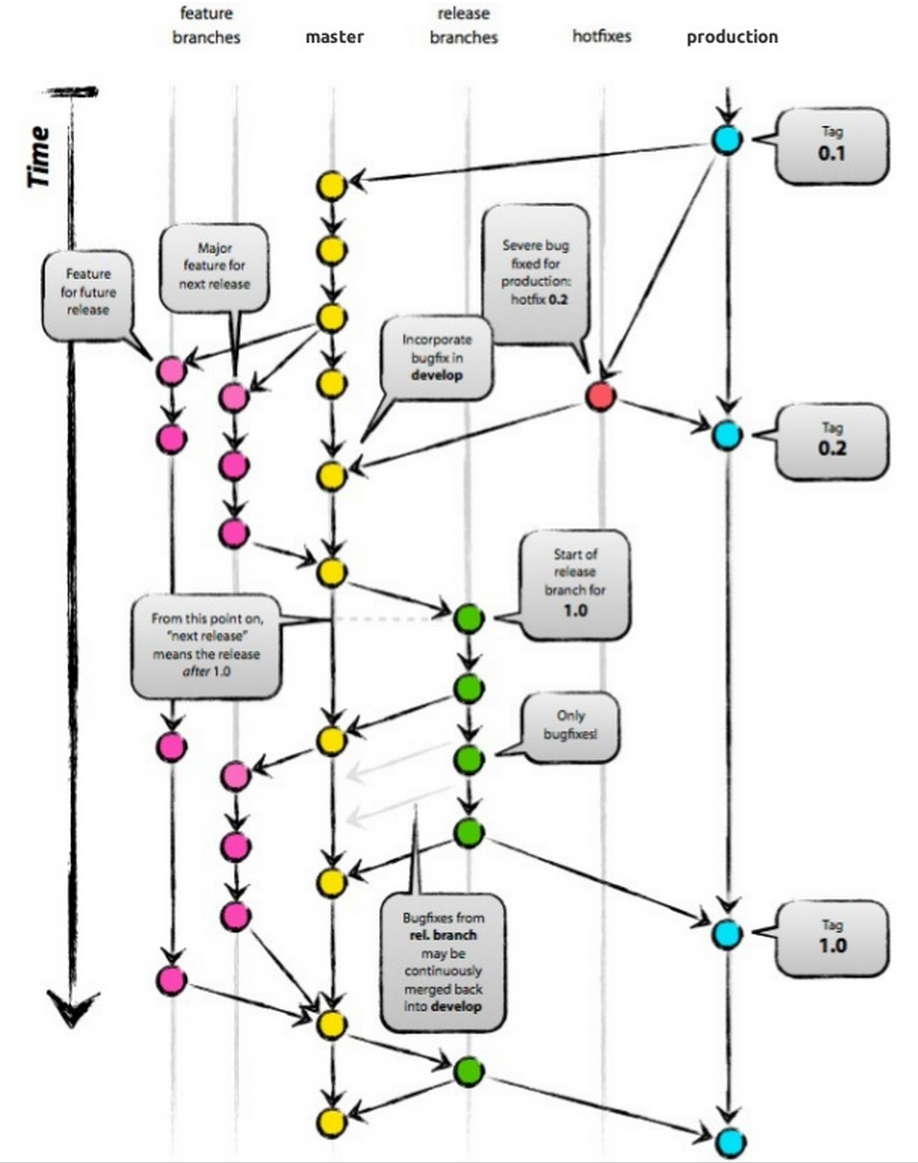
…is a popular strategy which works around the master branch, but in a less “aggressive” way (than the GitHub flow pattern for instance). You have two main branches:
-
master branch contains the latest production code that has been deployed, and versioned with appropriate tags for each release.
-
develop branch that gets branched off master and contains the latest code for the next feature that is being developed. For each new feature there might be lots of feature branches (always branched off the “develop” branch).
Beside the main branches, there are so-called supporting branches:
Beside those, there are supporting branches:
-
feature branches contain the development state for a single feature of the overall product (i.e. a user story). They are merged off the
developbranch. -
hotfix branches are branches for quick and severe bugfixes. they are usually branched off the master branch, fixed in the hotfix branch and then merged back in master and develop as well.
-
release branch is a branch for preparing the next release. No new features will be developed on this branch but rather it contains some last fixes (also bugfixes) and adjustments for going into production.

Production branch oriented
Many people prefer to see master as their development branch and instead have a dedicated one for the production environment.
Such a production oriented branching strategy has
- master branch which contains the actual development code (corresponds to the “develop” branch in the git-flow model)
- production branch contains the deployed code.
Supporting branches are:
- feature branches which contain the development of specific features and are branched off master and merged back into master
- hotfix branches (works like in the standard git-flow model)
- release branch (works like in the standard git-flow model)
Source: http://www.slideshare.net/lemiorhan/git-branching-model
Usage
In my opinion tools are great as they (mostly) give you some productivity boost. Nevetheless you should always understand what they do behind the scenes. This section lists the commands you’ll need to manually implement the production-oriented “git flow” pattern shown above.
First of all you have to initialize an empty repository and eventually connect it immediately to your remote one. Obviously, feel free to skip this step if you already have one.
$ git init
$ git remote add origin git@.....
Furthermore I’d suggest to also add a .gitignore file. You may start from an existing one based on your project type: Github .gitignore repository.
“push” everything up to your remote repo.
$ git push --set-upstream origin masterCreate a new Feature
From master
$ git pull
$ git checkout -b userstory/login
Do some commits and then publish the feature on the remote repo (if not a tiny one of a couple of hours)
$ git push origin userstory/loginUpdate feature from master
Frequently update from origin/master to get the latest changes that have been pushed to the repo by your peers.
$ git fetch origin master
$ git rebase origin/master
Alternatively checkout your master branch and execute
$ git pull master
$ git checkout <yourfeaturebranch>
$ git rebase master
Note, when you rebase with master, your branch might not be easily updateable with its remote counterpart (given you synched it up to a central repo). In such case you can use the --force flag.
Caution! Inform yourself on the Git docs about the potential dangerous side effects when using the --force flag!
Only use the force flag if you haven’t shared the branch with anyone and it is simply your central backup. Force overwrites the history with your local repository state inside your current branch.
$ git push --force origin <yourfeaturebranch>Finish a feature
Before merging back to master, make sure you polish your git history. This is something I see people often forget or don't care about. But it's really easy and leads to a much clearer and more understandable history (which helps in resolving issues as well). In this article I explain how do to it.
Merge it back into master
$ git checkout master
$ git pull
$ git merge --no-ff userstory/login
--no-ff means no fast-forward to keep track from where certain changes have originated.
In order to not forget the --no-ff flag you might want to configure it as the default behavior when merging into master by executing the following command: git config branch.master.mergeoptions "--no-ff"
In case of conflicts, resolve them and then push the master
$ git pushand remove the userstory (locally and remote)
$ git branch -d userstory/login
$ git push origin :userstory/login
Prepare release
$ git checkout -b release/0.1.0Publish production
$ git checkout production
$ git pull
$ git merge --no-ff release/0.1.0
$ git tag v0.1.0
$ git push --tags origin production
Delete the release/x.x.x branch.
Create a hotfix
$ git checkout production
$ git checkout -b hotfix/login-does-not-work
After testing it, merge back into production
$ git checkout production
$ git merge --no-ff hotfix/login-does-not-work
$ git tag v0.1.1
$ git push --tags
Obviously also merge those changes back to master as well
$ git checkout master
$ git merge --no-ff hotfix/login-does-not-work
And then delete the hotfix branch
$ git branch -d hotfix/login-does-not-workOk..I’m a Jedi..give me some tools
Git flow CLI tool
Git Flow is a git command line extension to facilitate the usage of the “git flow” pattern.
So, if you mastered to use the git flow pattern manually, you’re ready to go with it.
Haacked’s Git Aliases
Phil Haack (former Microsoft employee and now working on GitHub for Windows @ GitHub) published an interesting set of 13 git aliases to boost your productivity. You might want to take a look at them:
http://haacked.com/archive/2014/07/28/github-flow-aliases/
To install them, simply copy&paste the aliases into your .gitconfig file. You should find it in your user profile directory (~ on unix systems; C:\users\<yourname>\ on Windows).
Configuring Jenkins
Please refer to my recent blog post “Git flow with Jenkins and GitLab” for further details on how to configure your build environment.
How we use it - our pipeline
We adopted the git flow pattern in one of our projects with a team getting in touch with git for the first time (they used TFS before). I introduced them to the Git basics and then they started straight ahead and surprisingly the switch was really easy. By using git flow we minimized the conflicting merges and thus potential problems in the development flow.
So how did we use it? The team applied some kind of Scrum (we’re new to it, thus “some kind of” :)). We have two weeks iterations with an initial planning phase (usually on thursday morning) and we have the tester on the team (yay!).
- At the start of the sprint cycle, our devs take their user stories (on Trello) and create corresponding feature branches having the pattern
userstory/<trello-card-#>-userstory-titlefor userstories,task/<trello-card-#>-titlefor tasks andbug/<trello-card-#>-titlefor bugs. - The develop on the feature branches and fequently update them with master (see git flow usage above). If the story/task/bug’s implementation takes longer than a day or two, the branch gets pushed to the remote GitLab server (for backup reasons). Each of these pushes gets automatically build and tested by our Jenkins.
- Once finished with the implementation, the developer either merges it with
masteror creates a merge request on GitLab assigned to another developer for code reviewing. Whenmastergets pushed to GitLab, Jenkins automatically takes it and publishes it to our dev server instance. - Once every night, the
masterbranch gets automatically published to our test server instance s.t. the tester in our team can continue to test the implemented stories and either mark them as done or reject them within our spring cycle. Furthermore a series of automated jMeter tests get executed that verify the correct functioning of our REST api as well as the performance of our endpoints. - After the 2-weeks-cycle one of our devs prepares a release (see the kind of commands to execute in the “git flow usage” above) by merging
masterontoproduction. This is automatically detected by Jenkins which - again - publishes to our preproduction server instance which is also accessible by our customer.
We do not use release branches as we don’t need them so far. There is no preparatory work to be done, although that might eventually change in the future.
That’s the flow we came up with after a few iterations and dicussions within the team and with our tester. What’s your approach?? I’d be interested to hear in the comments.