Getting Started with Git and Visual Studio


A couple of weeks ago I wrote an introductory article ”Git Explained for Beginners” which aimed at introducing Git to beginners on the basis of Git’s underlying tree structure. Since that article turned out to be quite popular and since I’m currently planning an introduction for our .Net devs on that topic, I decided to write this article, using a similar approach, but show-casing the use of Git from within Visual Studio.
Terminology
For getting introduced to the Git terminology, please refer to my previous article.
Workstation/Visual Studio Setup
Recently Microsoft seems to recognize Git as a valuable alternative to its proprietary TFS (Team Foundation Server) to what regards version control and as such it started to release its own Visual Studio extension which is currently in “preview” phase. You can find it here: Visual Studio Tools for Git (Microsoft)
Scott Hanselman wrote about it as well. I quickly tried the plugin and although it perfectly integrates with Visual Studio (mostly like TFS), it is still too much beta for my taste.
Currently the best alternative I found is to install Git Extensions for Windows and Git Source Control Provider Visual Studio Plugin. The following sections go through their corresponding installations.
Install Git Extensions for Windows
The first step is to download Git Extensions from the corresponding Google Code Repository.
Its installation wizard will install everything you need to have a complete Git setup, installing Git (from git-scm) to the different Unix tools to the Git Bash.
After you have installed everything, make sure all entries of the Git Extension’s checklist pass for having a trouble-free Git experience.
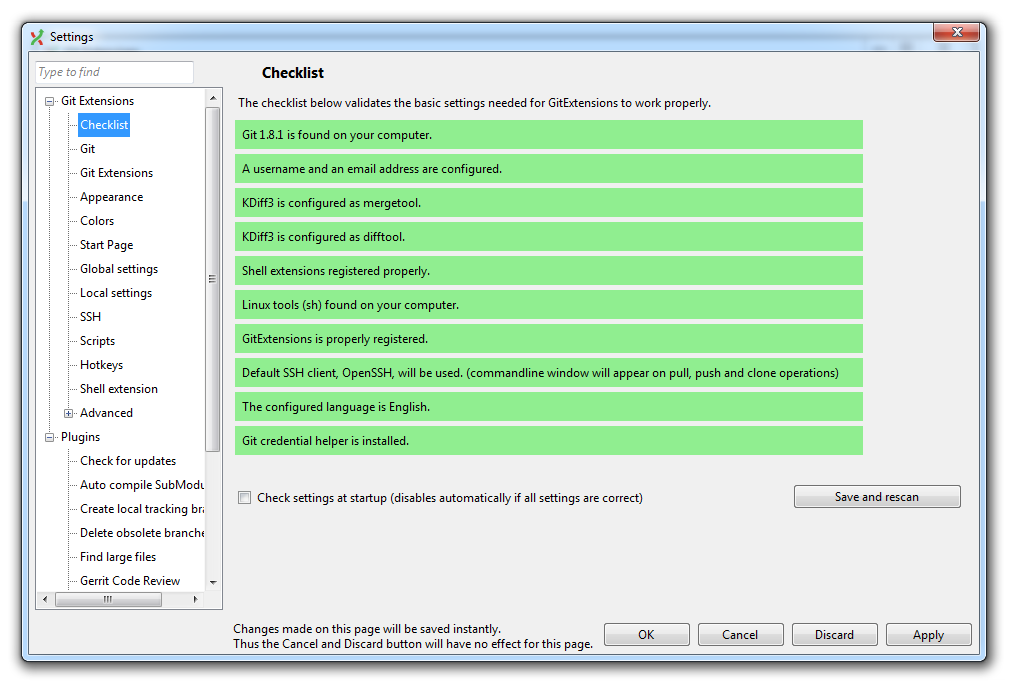
You find this checklist when opening the Git Extensions application, and then by navigating to Plugins > Settings.
Installing Git Source Control Provider
Git Source Control Provider is an open source extension that uses your machine’s Git installation and integrates it into Visual Studio.
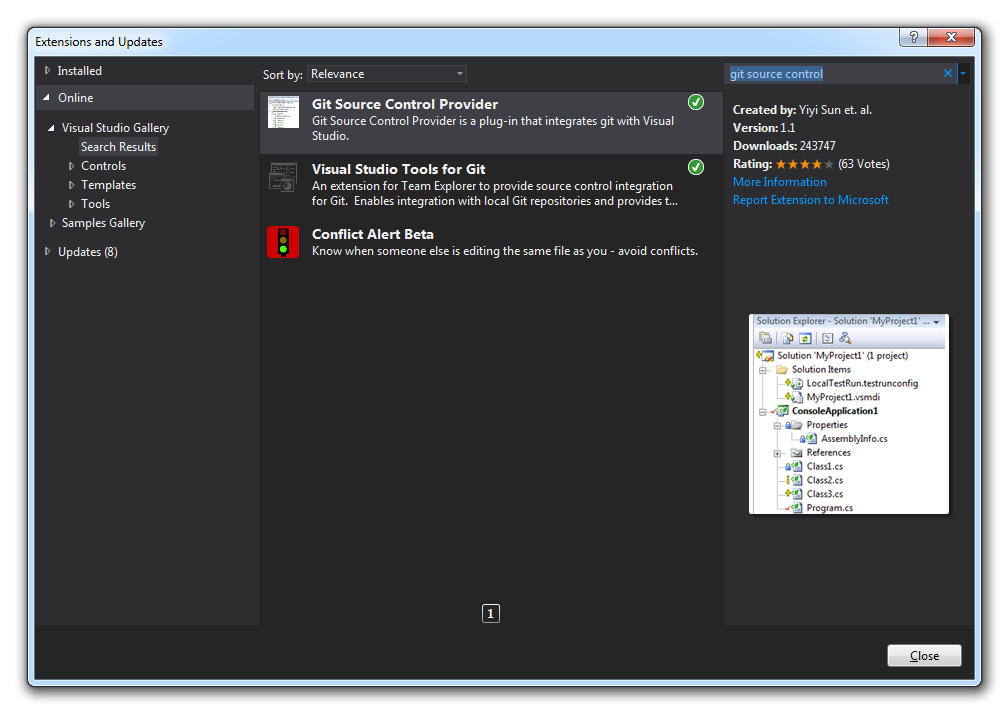
If you have successfully setup Git (following the procedure mentioned before), you can go ahead and install the Git Source Control Provider extension for Visual Studio. The easiest way is probably through its “Extensions and Updates” dialog where you have to simply search for “git source control”.
As one of the next steps you need to correctly set the source code provider within Visual Studio as you might have more of them (i.e TFS). This is done in Visual Studio’s preferences in the “Source Control” section:
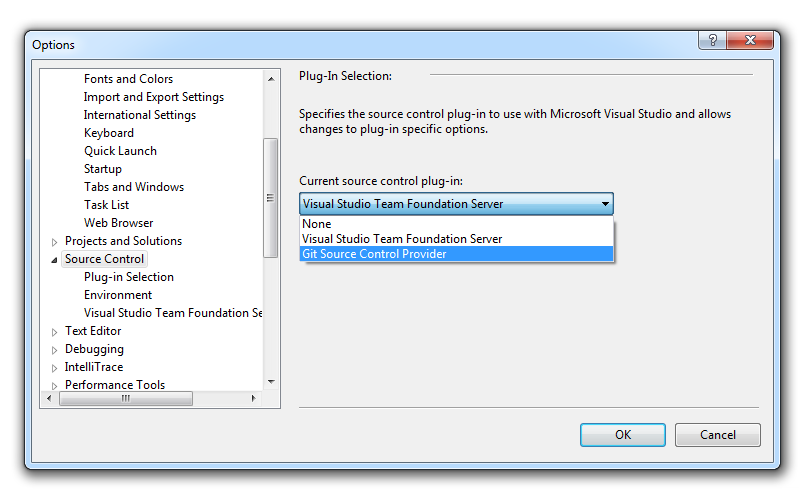
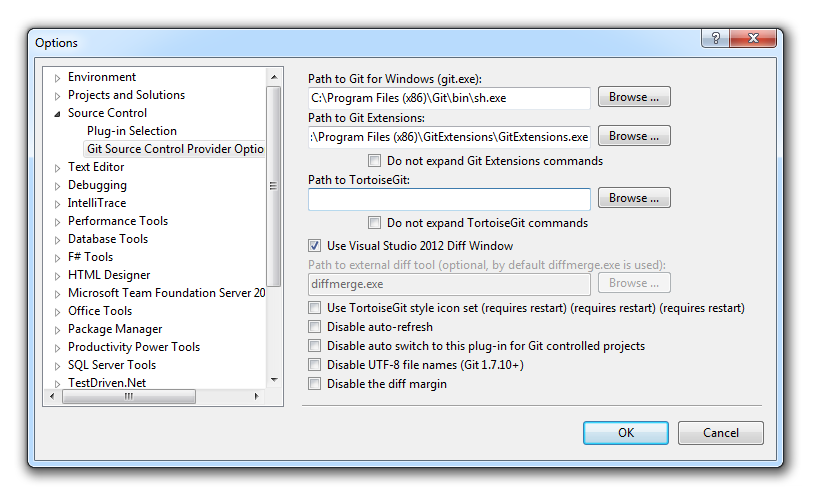
You should see an entry saying “Git Source Control Provider”. Choose that one and confirm your setting. After that you should also make sure it references your Git and Git Extensions installations correctly:
Configuring your SSH key
Many Git server repositories allow for different authentication models:
- through https or
- by generating an SSH key.
Personally, I prefer the latter as I hate to continuously enter my credentials.
To get a guide on generating a public SSH key just consult the documentation on GitHub which is quite detailed and well explained.
Well, that’s it for the installation part. You should now be ready to get started.
Let’s get started: Create a new Git Repository
First of all, I simply create a Console project, as the focus here is not on creating something nice and working, but rather to demonstrate Git’s integration into Visual Studio. Once the project is created we can set up the local Git repository.
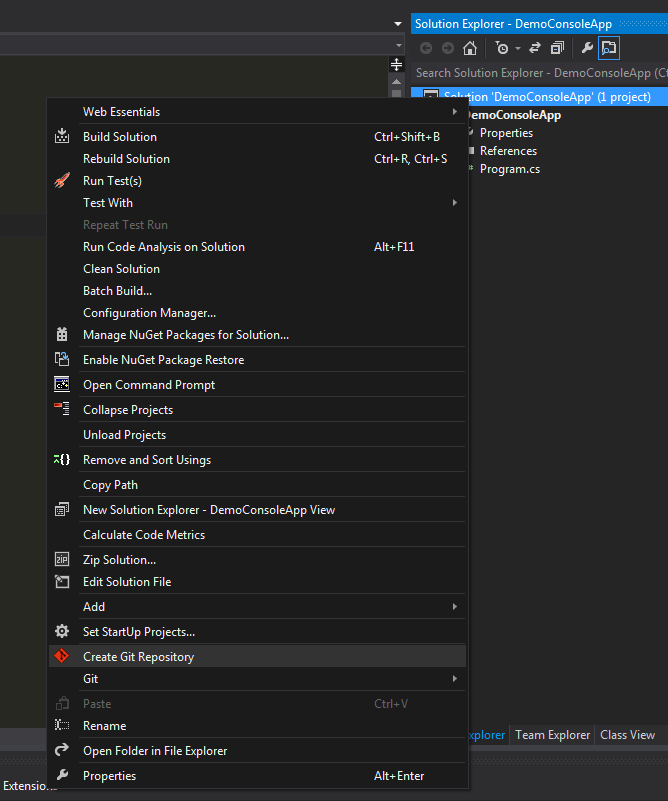
This is done by right-clicking on the solution and then choose “Create Git Repository”:
After that operation you should see the repository to be setup successfully:

Moreover, you should see some files listed in Git’s pending changes window:
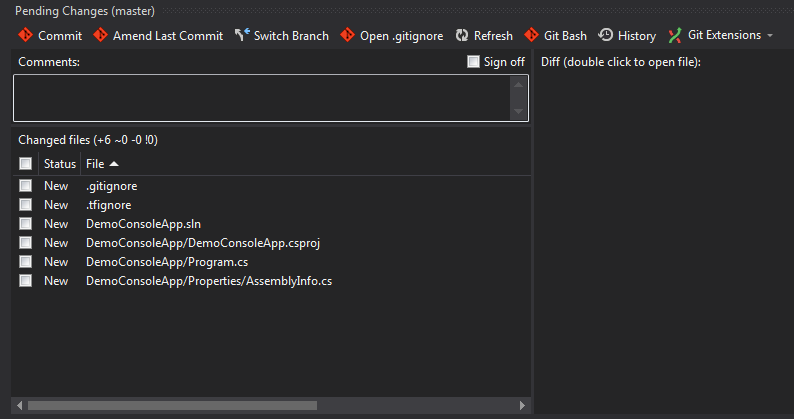
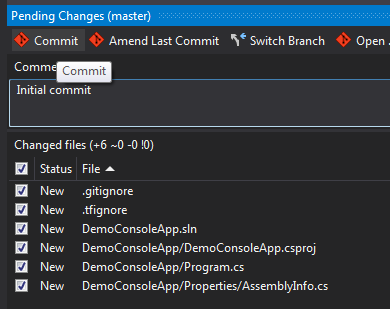
Just click them all, add a meaningful comment and commit them by pressing the “Commit” button
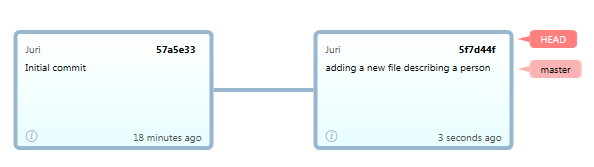
Git SCP (from now on to refer to the Git Source Control Provider extension for VS) provides a very nice and handy mechanism for viewing the actual situation of your Git repository, namely by visualizing its underlying Git tree. Just click the “History” button…

…in the “Pending changes” window and a new window will open, displaying a nice graph:

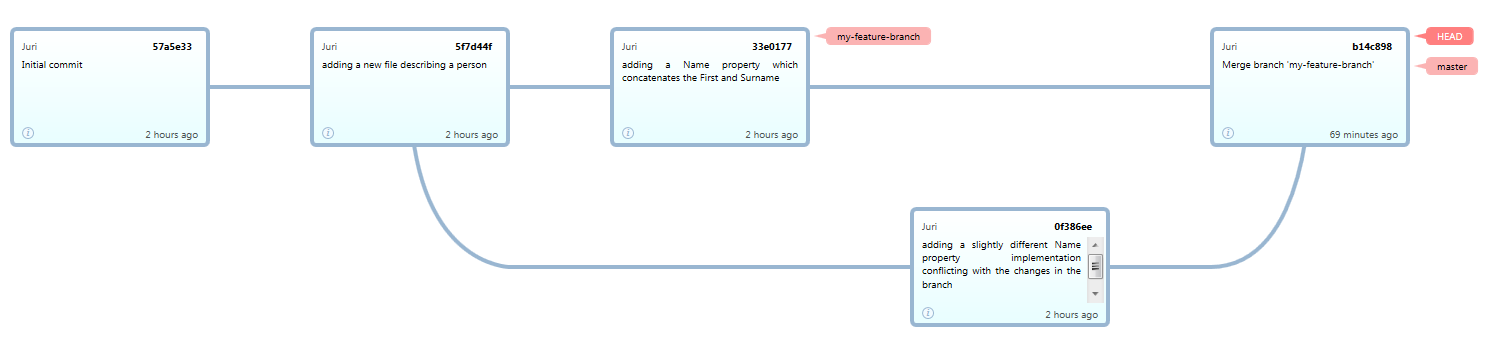
So far nothing spectacular, but it shows that our initial commit created a note to which (as expected) HEAD and master point to. Clicking on the node reveals further details such as the involved files and according diffs.
.gitignore
An important aspect I didn’t mention in my previous Git tutorial is the concept of the .gitignore file. This file basically contains a set of lines specifying which artifacts should be ignored by Git. Normally these are IDE specific files or compiled binary files.
Out of the box Git SCP already creates one that is suitable for Visual Studio. Otherwise you can refer to the gitignore GitHub project which is a collection of .gitignore files for the different kind of IDEs and programming languages.
Create and commit a new file
Simply add a new file to your Visual Studio project. I added Person.cs with some dummy content. You should immediately see the changes listed in the Pending Changes window.
You can open the Pending Changes window by right-clicking the Visual Studio project or solution file and then choosing "Git (master)" followed by "Pending Changes".
Again, just like before, select the files you want to include, add a meaningful comment and commit them.
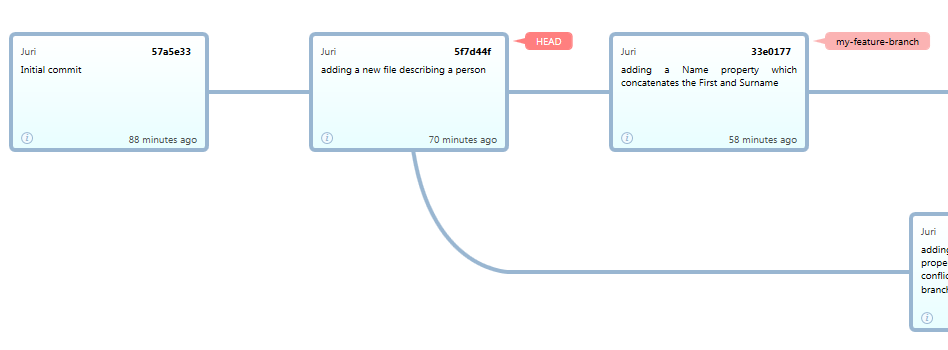
Our tree after the commit looks like this:
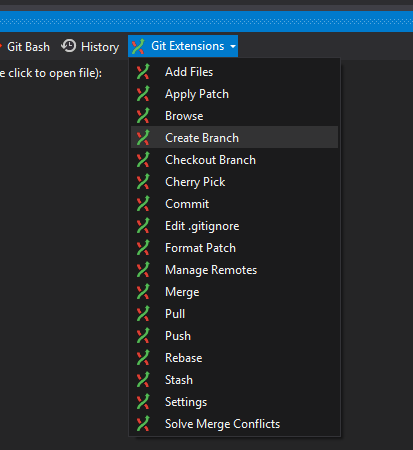
Create a (feature)branch
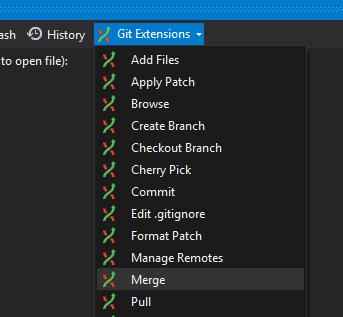
To create a new branch, select the Git Extensions button on the pending changes window and then Create branch
This action will open a new dialog window, allowing you to first of all select the point in history from which you’d like to branch and then to specify its name:
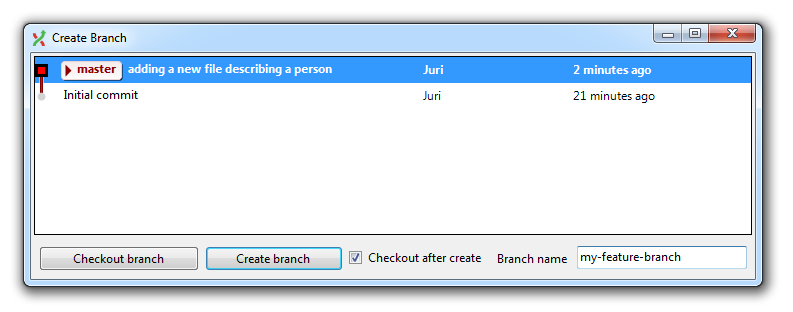
Note: we also select the checkbox “Checkout after create” s.t. we immediately switch to the new branch. This would somehow be similar to a
git checkout -b <branch-name>command on the shell.
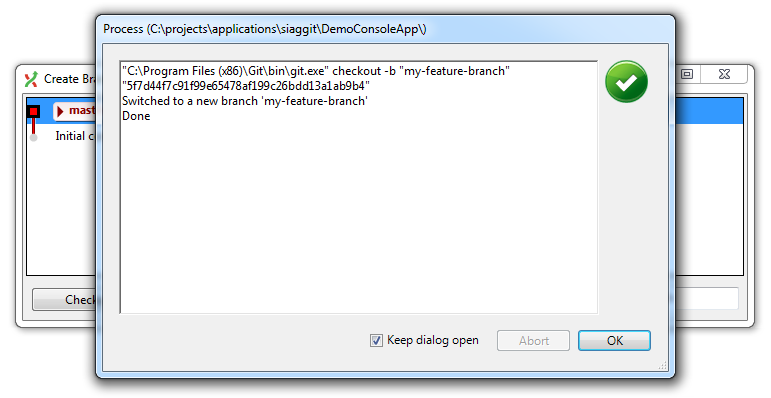
A confirmation dialog shows the success of the operation and the executed command on the shell.
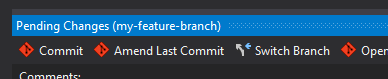
Moreover, in the Pending Changes window we now see the current branch we’re on, which is the just created “my-feature-branch”.
We can now modify an existing file - say our Person.cs - and commit it. The Pending Changes window exactly shows the diff of the changes before we commit them
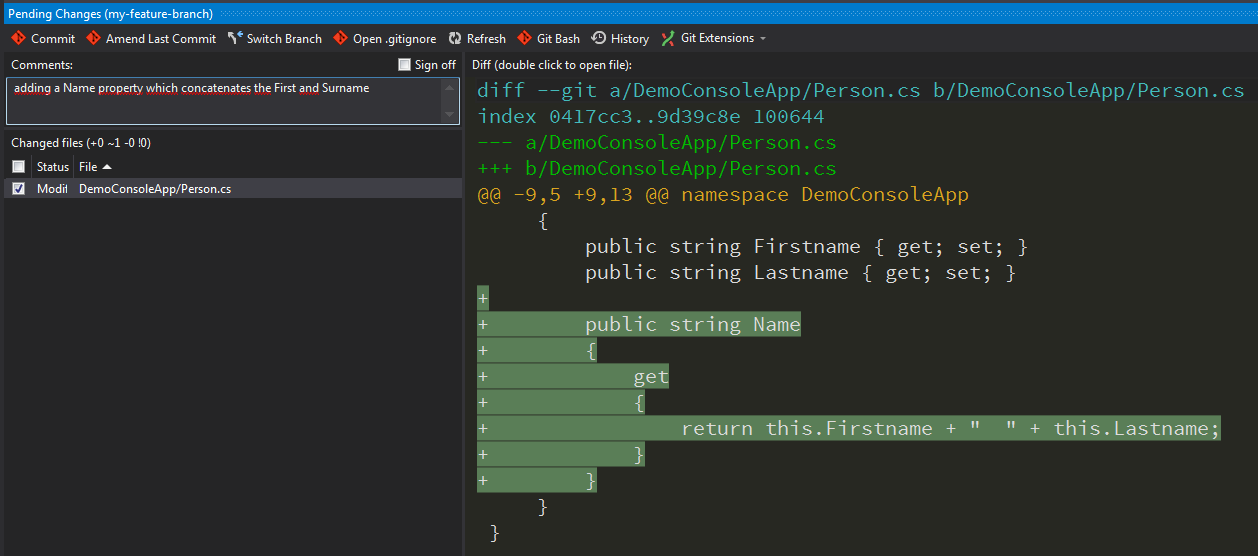
After committing the changes, the tree has advanced and note that now master and my-feature-branch point to different locations. HEAD is on our feature branch as it is the current active one.

Merge and resolve conflicts
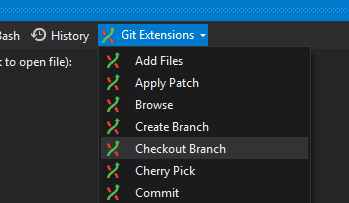
Let’s switch back to master. We can do this - again - by using the Checkout branch button from the “Git Extensions” menu.
We have to select master as our branch and continue.
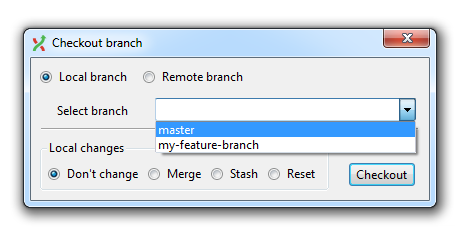
Note: there are options on how you’d like to treat any local changes that have not yet been committed, i.e. to stash them.
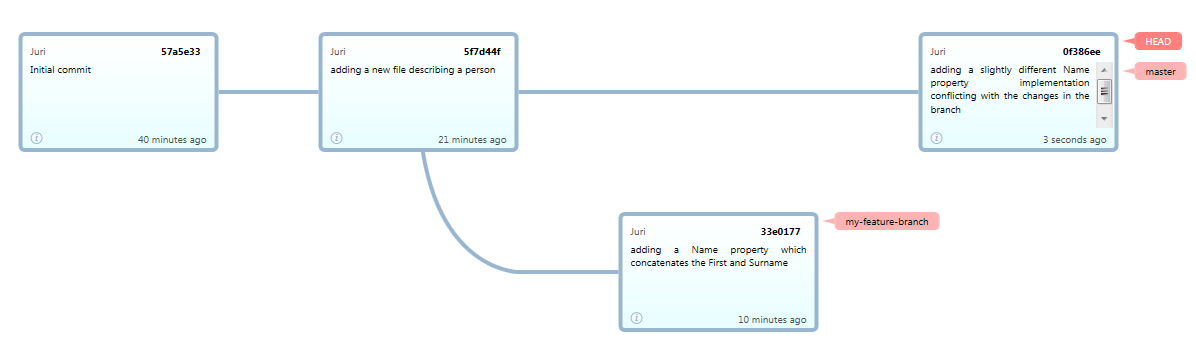
The Git tree reflects that switch to the master branch as its HEAD now correctly points to master again.

What I’d like to demonstrate in this section is on how to resolve a merge conflict. For that to work, we need to create another commit on master that conflicts with changes on my-feature-branch. As such, let’s modify Person.cs accordingly.
Our tree now reflects the existence of our feature branch more prominently.
Performing the Merge
Consider that we want to merge the changes made in my-feature-branch to master. This process is initiated by using the Merge button from the Git Extensions menu.
A dialog opens, allowing us to specify the details of the merge.
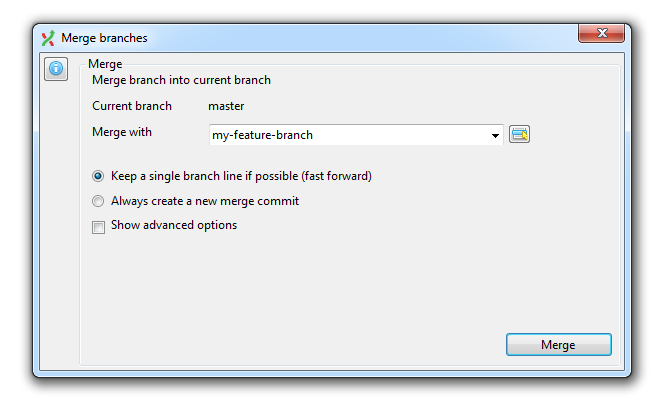
First of all, we choose the branch name which is my-feature-branch. Then, there are two other options:
“Keep a single branch line if possible (fast-forward)” - A fast-forward is explained as follows
[…] To phrase that another way, when you try to merge one commit with a commit that can be reached by following the first commit’s history, Git simplifies things by moving the pointer forward because there is no divergent work to merge together — this is called a “fast forward”. Git SCM: Basic Branching and Merging
Obviously, this only works when there are no conflicts.
“Always create a new merge commit” - This will simply create a new commit message explicitly specifying that something has been merged.
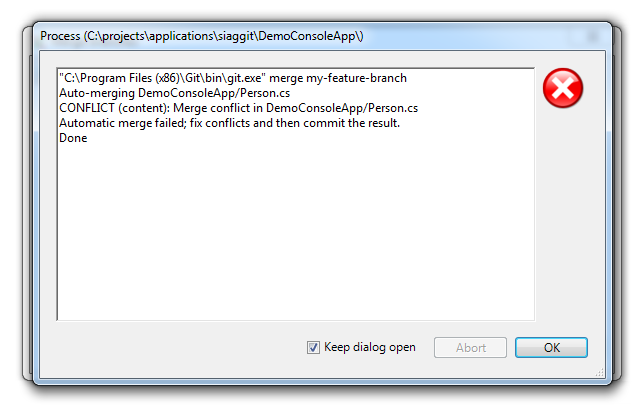
As expected, fast-forwarding fails and we get a merge conflict notification
The Pending Changes window shows the merge conflict

Git SCP will ask you on whether to solve or ignore the conflicts. If you answer positively, a dialog will open, showing all conflicting files.
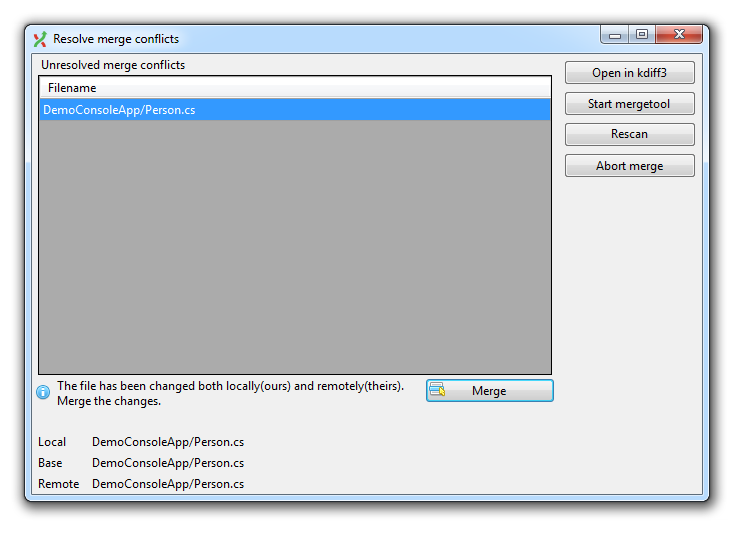
Click on “Start mergetool” to open your configured merge tool. In my case this openes “kdiff3”. This might vary on your system, depending on how you configured your Git installation.

After you have resolved all conflicts…
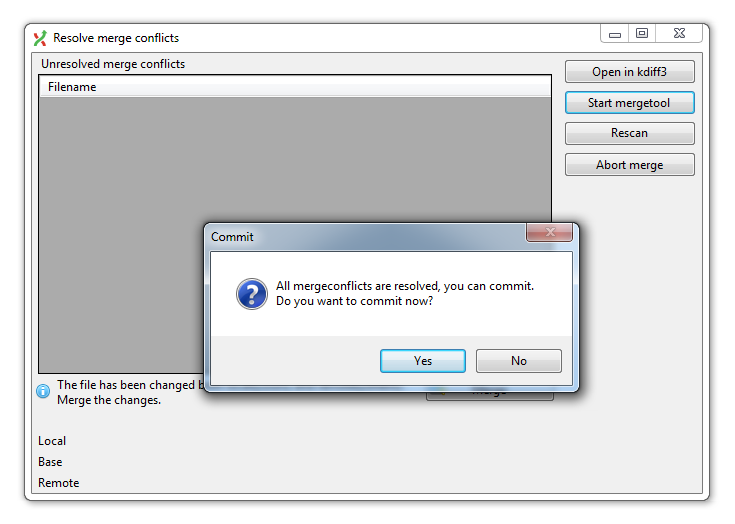
…you can continue with the commit procedure.
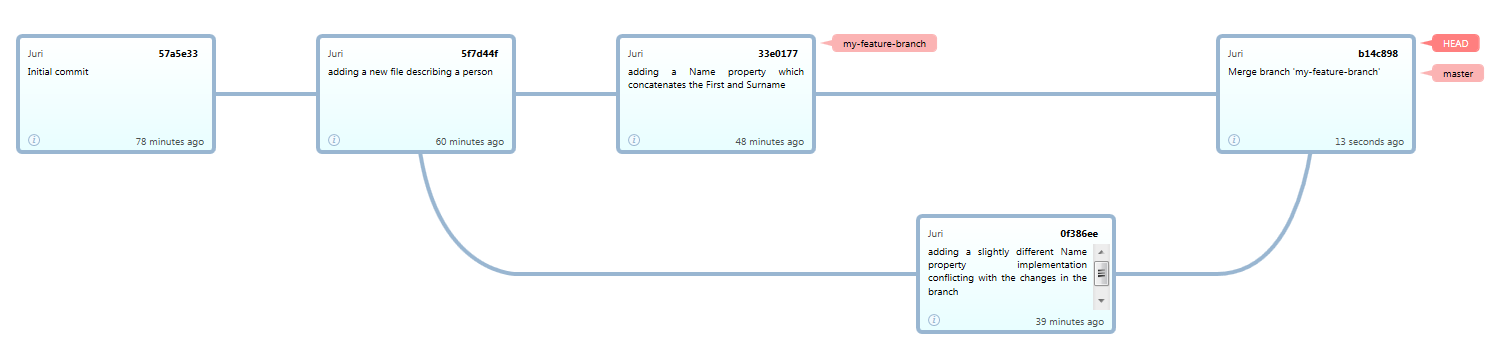
Again, the Git tree reflects the merge nicely
Jump to a certain commit
Jumping to a certain commit is quite easy and can be done by using the Browse command from the Git Extensions menu. This opens an external GUI visualizing the Git tree.
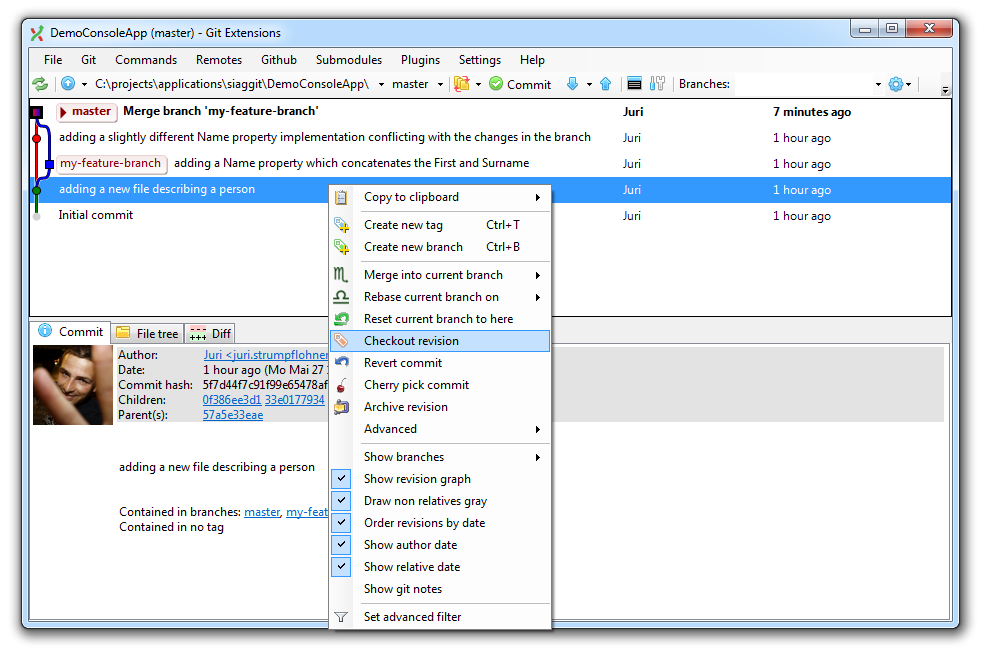
From there you can use the context menu and click on Checkout a selected revision.
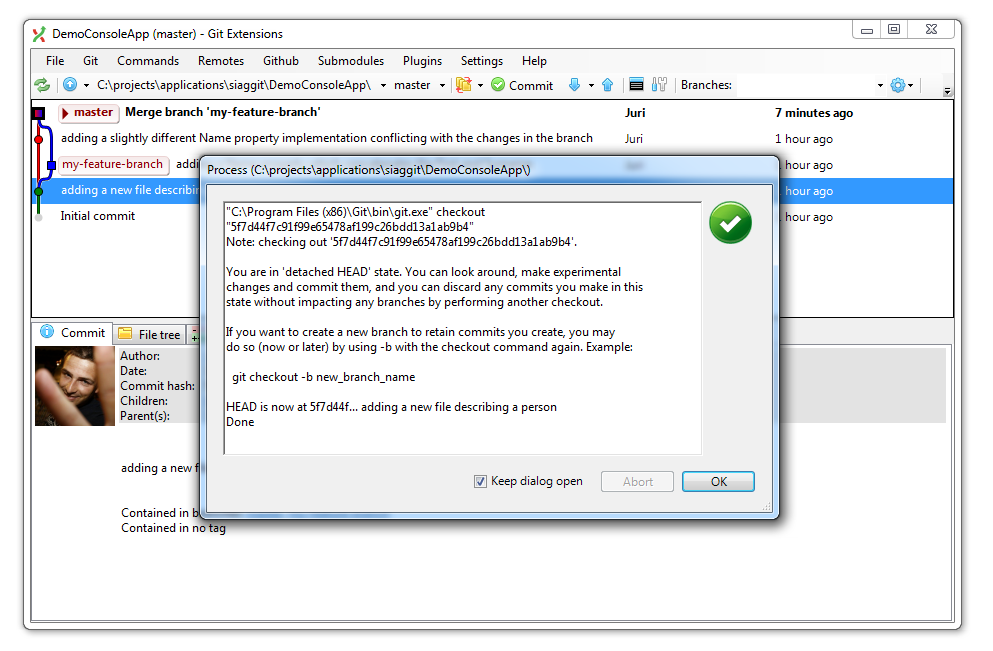
As a result you will transition into a detached head mode. In fact, take a look at the tree:
HEAD doesn’t point to a branch any more, but to a specific commit in history. To go back you can always simply perform a checkout on master or some arbitrary branch.
Rollback
A rollback can be performed in different ways and with different consequences.
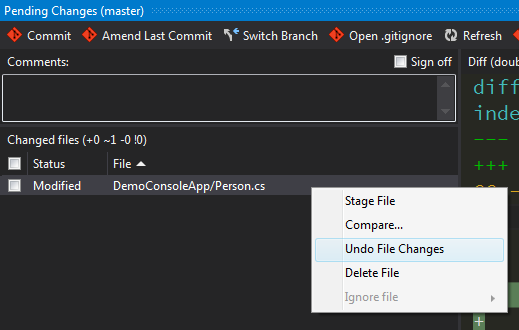
Files Not Staged For a Commit
Undoing local changes that have not yet been committed is quite easy and can be done by simply performing a right-click on the changed file and by selecting “Undo File Changes”
Oops, I forgot to Include…
If you have already committed a change to your repository and you recognize that you have forgotten something to include in that same commit (like the comment on that line of code)…
…then Git has a nice and handy functionality: the Amend Last Commit command. Just add your forgotten change and press the button.
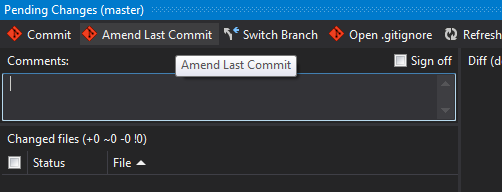
As a result, your last commit will include those changes as well, without leaving a trace that you actually made two distinct commits.
“Revert” Already Committed Changes
But now, assume we want to go back entirely, reverting that last change we made. We want, however, to explicitly show that “reverting” of the changes.
Note, reverting changes in this way is highly recommended if you synched your changes already with a remote repository.
To use the “revert” functionality, use “Browse” from the Git Extensions menu, right-click on the commit you’d like to revert and select revert commit:
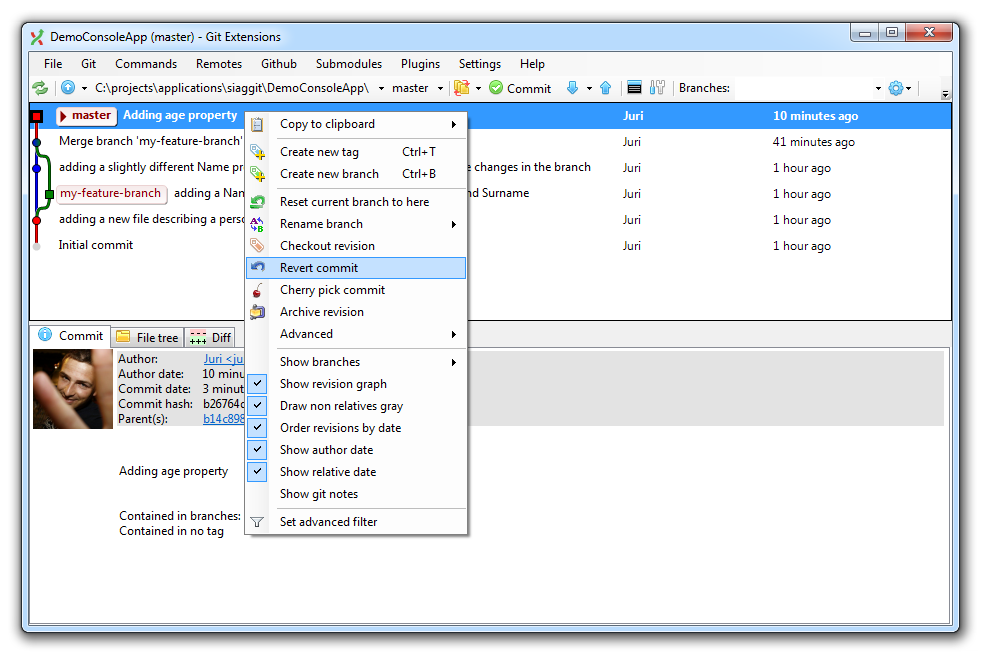
This will stage the reverted changes which you can then commit back to your Git repo.
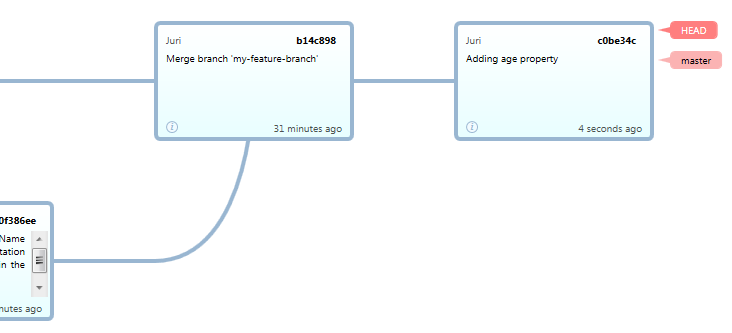
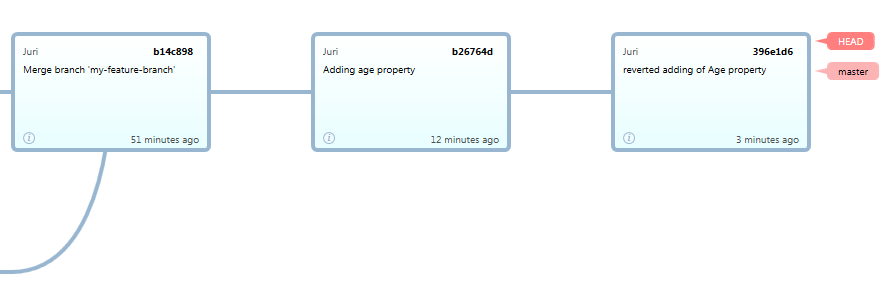
The tree after committing the reverted changes:
Discard Already Committed Changes
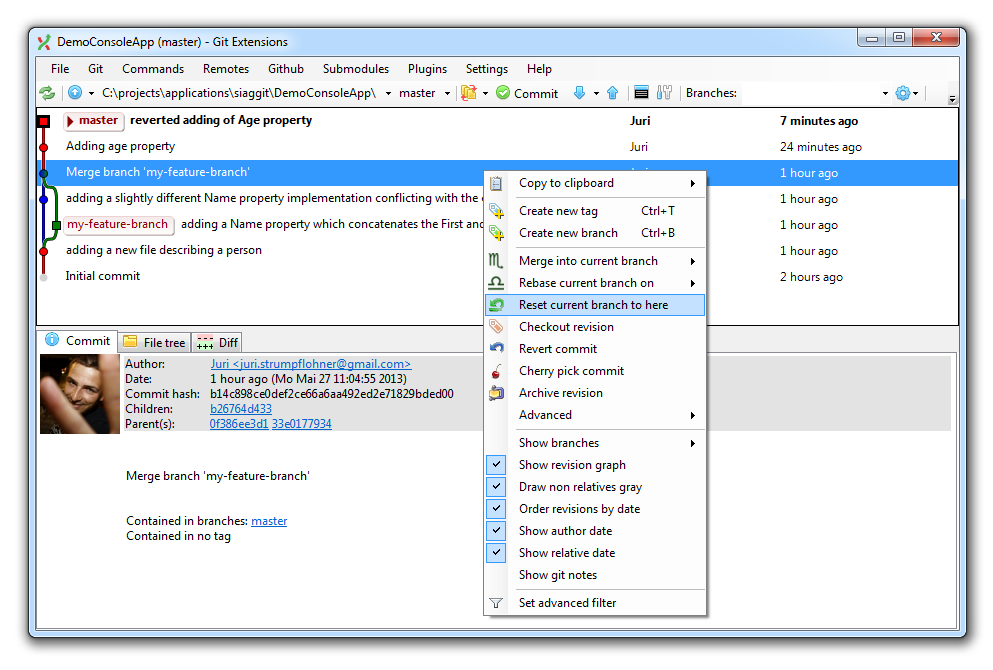
Let’s have a look on what we did before:
- we added a property to the
Person.cs - we performed a revert of adding the property
Basically, our two override each other. So if we are in our local repository and we have not synched these changes with any remote counterpart, we might think to completely remove both commits from our history. This doesn’t have any kind of benefit other than doing some housekeeping. For this to happen, we can use the reset command. We select the point in time (i.e. the commit) up to which we want to reset and click the “Reset current branch to here”:
You will have different kind of possibilities
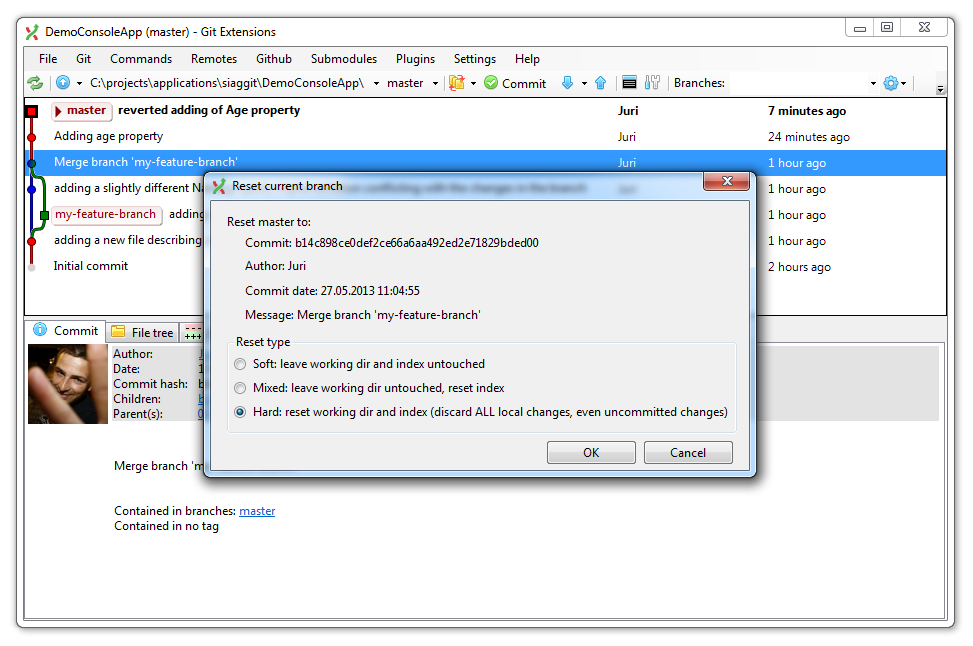
In this situation I prefer doing a hard reset as I don’t care to keep the changes in the directory. After the reset, our Git tree has no trace about the previous commits:
Sharing/Synching your Repository
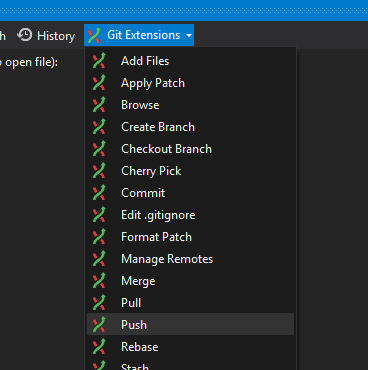
So far we have worked exclusively on our local Git repository. To publish our repository in order to share it with our mates, we need to Push it to some remote location. This can be done from the Git Extensions menu, choosing the Push command.
A new dialog window opens from which you can choose the remote location.
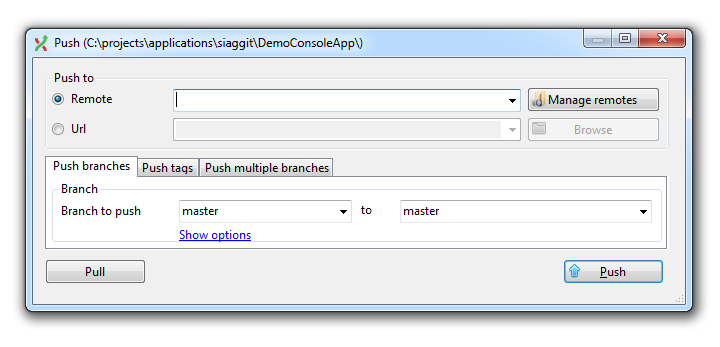
In case you have not yet configured any remote locations you have to do so by using the “Manage remotes”.

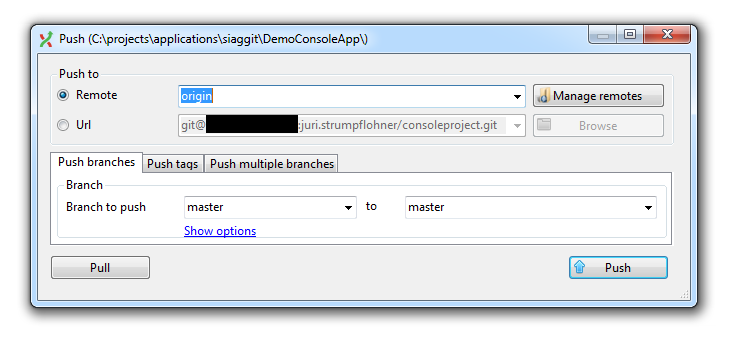
Note: By convention, the “Git remote” pointing to the origin repository is named origin.
After the successful configuration of the remotes, you can select one of them and push to it.
…and success!
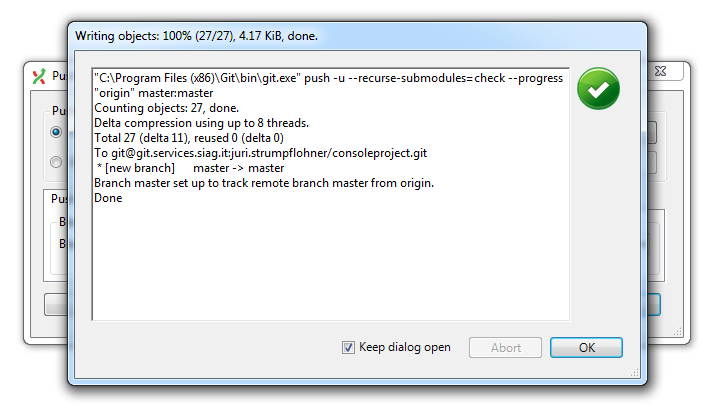
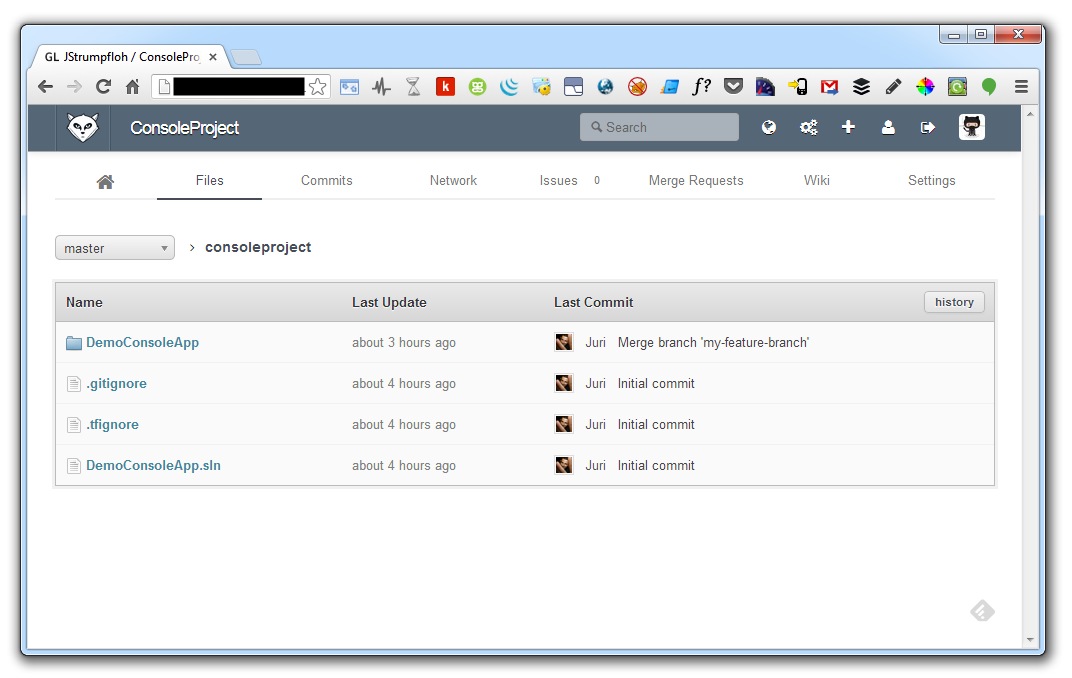
The files are now on the remote repository, in my case on our company-internal GitLab server:
Cloning
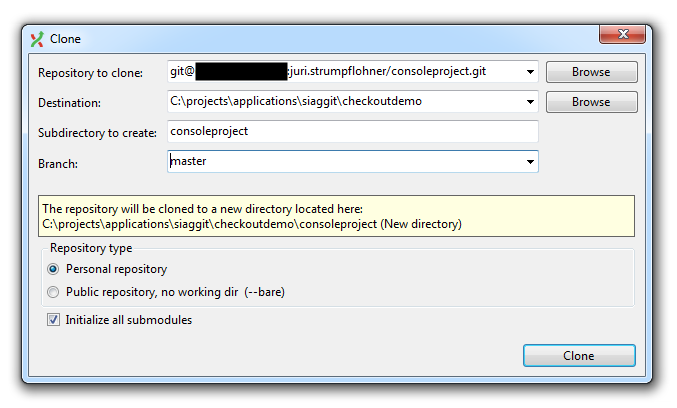
Similarly, your team mate has to do the opposite operation, namely to download (clone) the repository you just shared, to his local workstation.
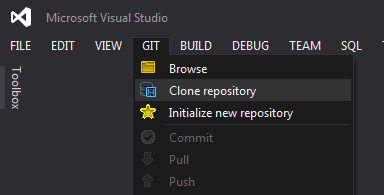
To clone an existing repository, use the Visual Studio menu and choose the ”Clone repository” command
A dialog will open, where you can then enter the Git repository url, the clone destination as well as the branch you want to checkout (normally master).
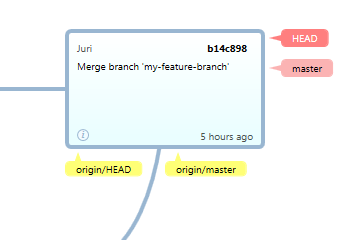
The tree now also shows the references to the remote counterparts (origin/HEAD and origin/master).
I’d like to Migrate my TFS Project to Git
Check out my post here which goes into the details on how to export your existing TFS repository to Git: